OK, like I said the other day, here is the start of the couple Holiday posts that definitely did not get posted before the Holidays!!
This year for the teachers and some of the neighbors I decided to take on the task of making CAKE POPS!!! Leave it to me to try and make something that I have never ever attempted to do, much less even know how to make in the first place!! I was a little nervous when I started making the pop, partly because I was kinda making up what I was doing as I went along, but mostly because I started the process after work on Monday, the pops were to be given on Tuesday, and every recipe I read told me to let the cake cool for 4-6 hours!! I defiantly did not have 4-6 hours for my cake to cool, but I completed my project in a somewhat timely manner with cake pops that (I thought) were pretty and (what others thought to be) delicious.
I will show you the steps that I took to make the pops, and at the end I will tell y'all a few tips to hopefully help y'all out if you ever try to make them yourselves!!
Step 1:Bake the cake! (duh!!) Since this was my first time making them, I decided it would be easiest to use a box cake mix.
Step 2: After the cake cools, break it up into small sections to make it easier to crumble
Remember how I said I did not wait 4-6 hours for the cake to cool?? This is how I speed up the process!! Which was fine, because this is one of the steps, I just did it a little sooner!!

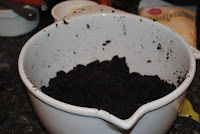
Step 3: Crumble the entire cake into a bowl and add about 3/4 of a container frosting. Mix it all together until the cake is sticky enough to mold into shapes
Step 4: After everything is all mixed together, roll the cake mixture into little balls, that measure about an inch in diameter. Place the little balls on a cookie sheet that has been lined with parchment paper, so they wont stick!
Step 5: Once the entire batch has been rolled into little balls, place them into the refrigerator for about an hour so that they harden up some. Again, I did not have an hour to wait, so I put them into the freezer for about 15 minutes.
While I was waiting for the balls to harden in the freezer, I set up my dipping station (to the right). For my first time, I decided to take it easy and decorate the pops with sprinkles and candy cane bits.
Step 6 and 7: Melt the candy coating and put the little balls in the fridge so they do not freeze.
Once the coating in melted take a few of the balls out of the fridge and get ready to start dipping!!
Step 8: Dip the stick in the melted candy and then put the stick into the cake pop and then dip that into the candy coating. Make sure that the entire pop is covered, then tap it lightly on the side of the bowl to get the excess coating off.
Step 9: DECORATE!!! I Just dipped the tops of mine into white sprinkles and candy cane bits.
Step 10: Let the candy coating harden then they are ready to eat!!!
My first cake pop!!!!
The decorating part of the process surprisingly did not take as long as I had anticipated. I'm sure if I made them into Christmas trees or something, it would have taken longer, but I like their simplicity.
This one did not want to stay on the stick, so I decided it would be the perfect on to taste!!
This was my "gifting station" I put each pop into a cookie bag and tied green ribbon around them.

The finished product all wrapped and ready to be given away!!
Now that I have made cake pops and cake balls (made at a later date), there are a few tips that I wish I had known prior to making these. Hopefully they will help y'all out if you decide to make cake pops!!
1. Having different stations helped to save time and are good to stay organized.
2. Breaking apart the cake after it had cooled a little bit helped it cool faster
3. Having a box or a piece of styrofoam to stick the pops in to harden is necessary. I only had a big box on hand to use, but I think that a large piece of styrofoam would be the best choice, especially if you are putting lots of detail into your decorating.
4. Cake pops (to me) were much easier and cleaner then cake balls. A few nights after I made the pops, I made some cake balls. They tasted just the same, but the dipping process took much more time and was messier, but that could have been because I made up my own way to dip them!
5. If you put the pops in the freezer to harden, after they have been in there for 15-20 minutes, move them to the fridge so they do not freeze.
5. If you put the pops in the freezer to harden, after they have been in there for 15-20 minutes, move them to the fridge so they do not freeze.
6. When dipping the pops. make sure your bowl is deep enough. This allows you to dip the entire pop at once.
7. Cake pops and balls are perfect for any and all holidays and occasions!!! They are perfect DIY favors for wedding, birthday parties and gift baskets, and the decorating ideas are endless!! hopefully I will get brave soon and try something a little more adventurous when decorating!!!
Whew!! That's a long one!! I hope y'all enjoy and trust me cake pops are easy to make and everyone will love them (and think you are an amazing baker)!!!!!
mSs


No comments:
Post a Comment